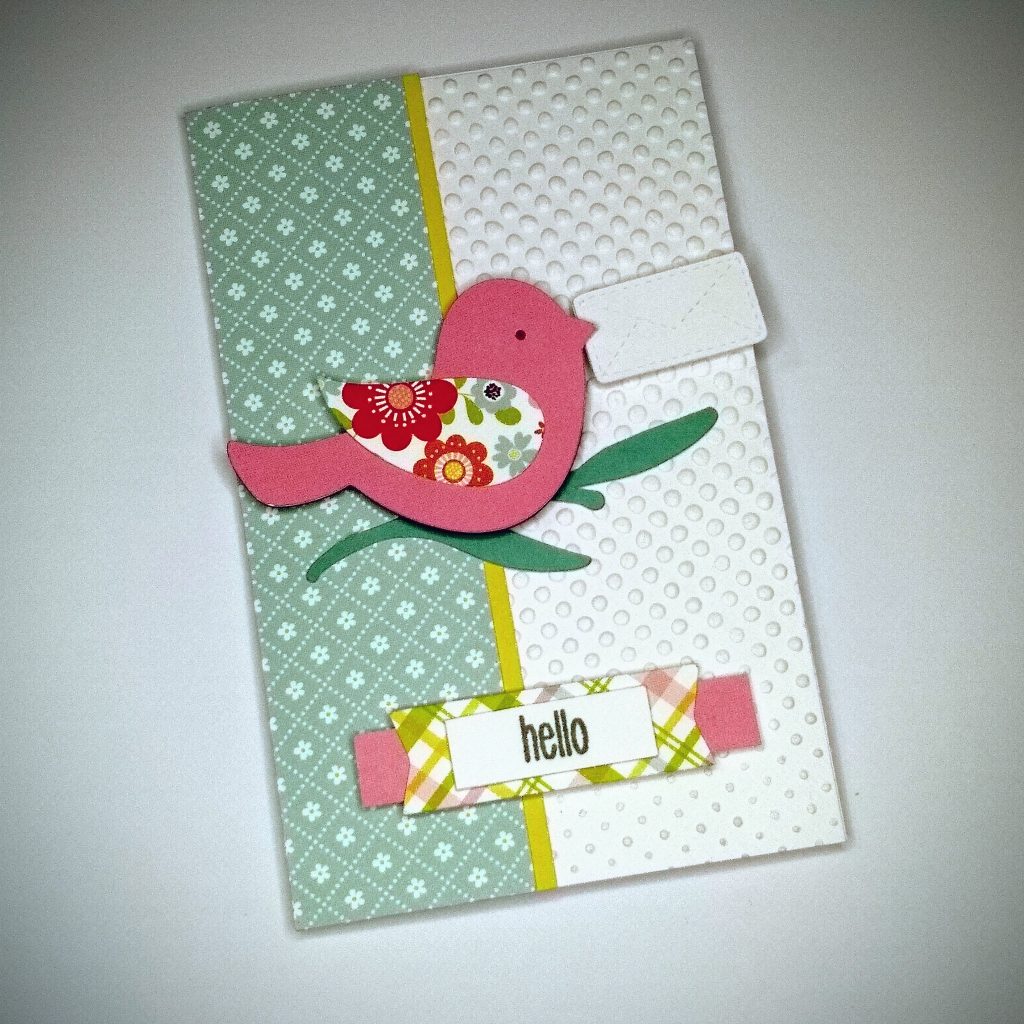
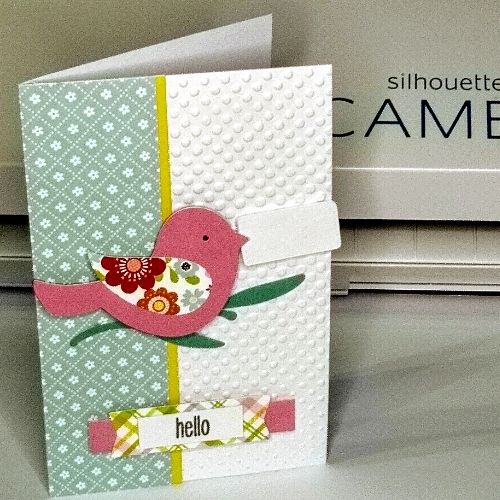
Spring Bird Handmade Card with Silhouette Cameo
Hello! Today I wanted to share a quick spring bird handmade card that I created with my Silhouette Cameo. I introduced this card idea in a recently uploaded video to my YouTube channel. I also shared how to use the tools to make the cut file for this little bird.
You’ll find a link to this video at the end of the post, as well as a way to share projects that you create with a cut file you make on your own. Read on to find out more…
I love to make my own cut files to use with my cutting machines. I also love Its’ been a while since I created a card!
Entering card challenges is also lots of fun for me. I’m posting in Cute Card Thursday today. The current theme is “Wings.”
You can find some of my cut files in my FREE SVG Library as well as my Etsy Shop and Creative Fabrica.
Using my Stash
One of the things I’ve been trying to do is use up my stash. I have just a few pieces of the Echo Park Spring Fling paper pack. You can see a couple of spring and Easter handmade cards that I made with this pack in THIS blog post.
I thought that this spring bird card was a great way to shop my stash and use up some more of this paper pack.
Creating the Envelope Element
The envelope element isn’t something that I covered in this video, but it was actually something I thought of after the fact.
I drew the envelope using lines, but then changed them to dotted. Then I used the offset tool to create a cutline for the outside of the envelope.
When I went to the send panel, I used score for the dotted lines and cut for the solid lines. I also used different colors for the solid and dotted lines so that I could choose the blade function in the send panel.
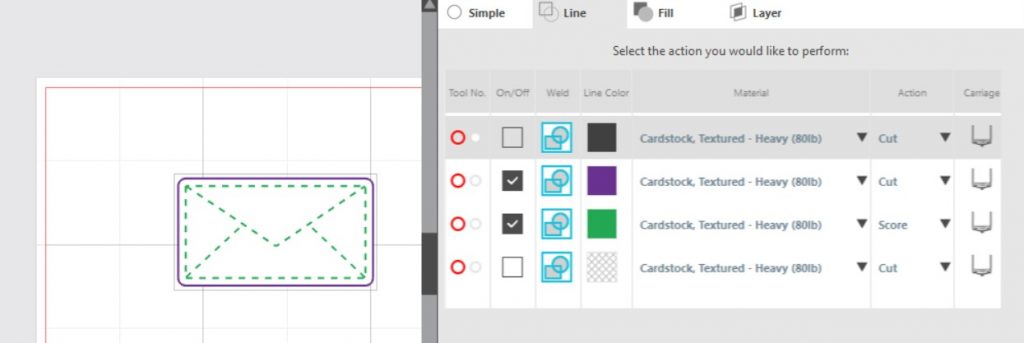
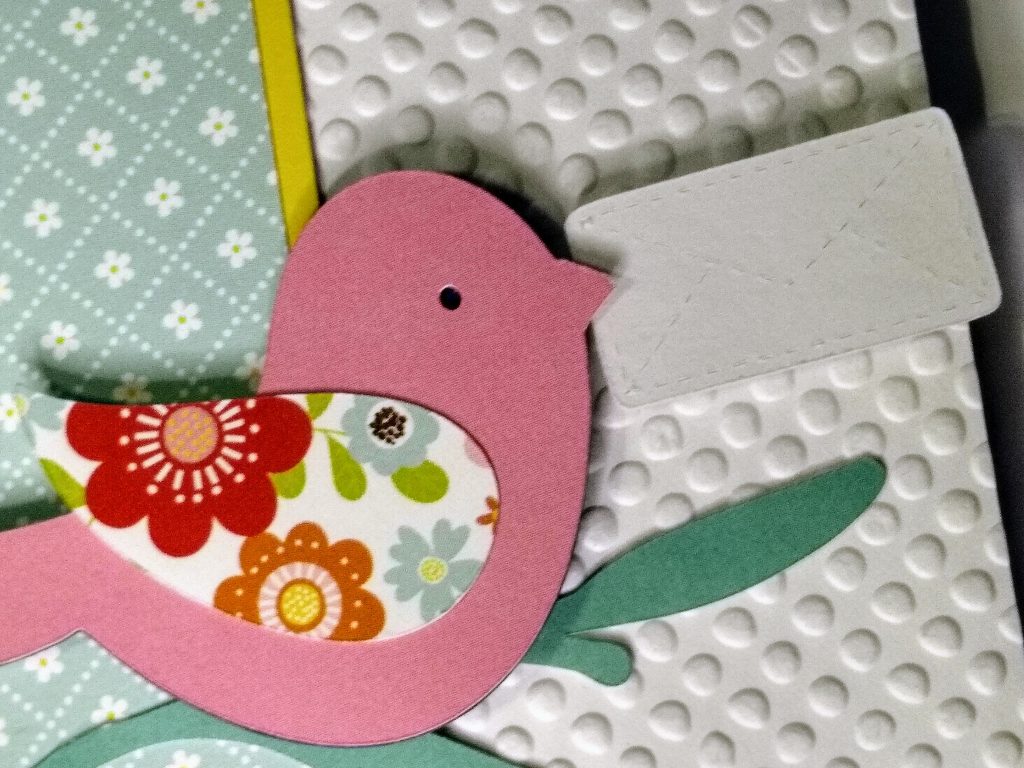
I think this helped to create a bit of a die cut look to the little message that was being delivered by my little bird friend.
Making a Skinny Card
Slimline cards are popular now and are typically 3.5″ x 8.5″. This spring bird handmade card was smaller at 3.5″ x 5.5″ so that it would still fit in an A2, but have a somewhat slim look.
I used a Cuttlebug dots embossing folder and my Cuttlebug to emboss the white right-side panel and just used other bits and pieces from that Spring Fling paper pack to finish up the card elements.
Extra scrap cardstock came in handy for making my own dimensionals to pop up the bird, envelope, and sentiment. I was out of foam tape and only had a few foam dots left. This worked out well and I’ll probably do this again in the future. If I remember right I’ve seen Jennifer McGuire do this and I think it’s eco-friendly and inexpensive.
The “hello” stamp used was from “flamingos2stamp” by The Stamps of Life.
Share Your Spring Bird Handmade Project!
I’ve created an InLinkz party if you would like to make your own bird cut file and share your project. The rules are very simple:
Create your own bird cut file in Silhouette Studio. Use it on any project you make using your Silhouette Cameo. You are not limited to cards. Feel free to create your own special project. Some suggestions are a tag, decal, wall decor, tote bag, banner, or another project.
You could use permanent vinyl, sketch pens, sticker paper, or whatever materials work for your project. Please leave a link to the original blog post or the YouTube video in your linked post. This is a link party for fun only. Please share the love by visiting the other creator’s projects.”
If you are not sure how to create a bird cut file in Silhouette Studio, be sure to check out the YouTube video HERE.
While it’s helpful to share your blog post URL or an Instagram post, you can still participate even if neither of these options are available to you. Simply upload your photo to the link party instead. I’d love to see all your “tweet” creations!
Thanks for stopping by today and have a wonderful day!

[fresh_inlinkz_code id=”5b1d7243791a4f4c95f2bd4352160288″]