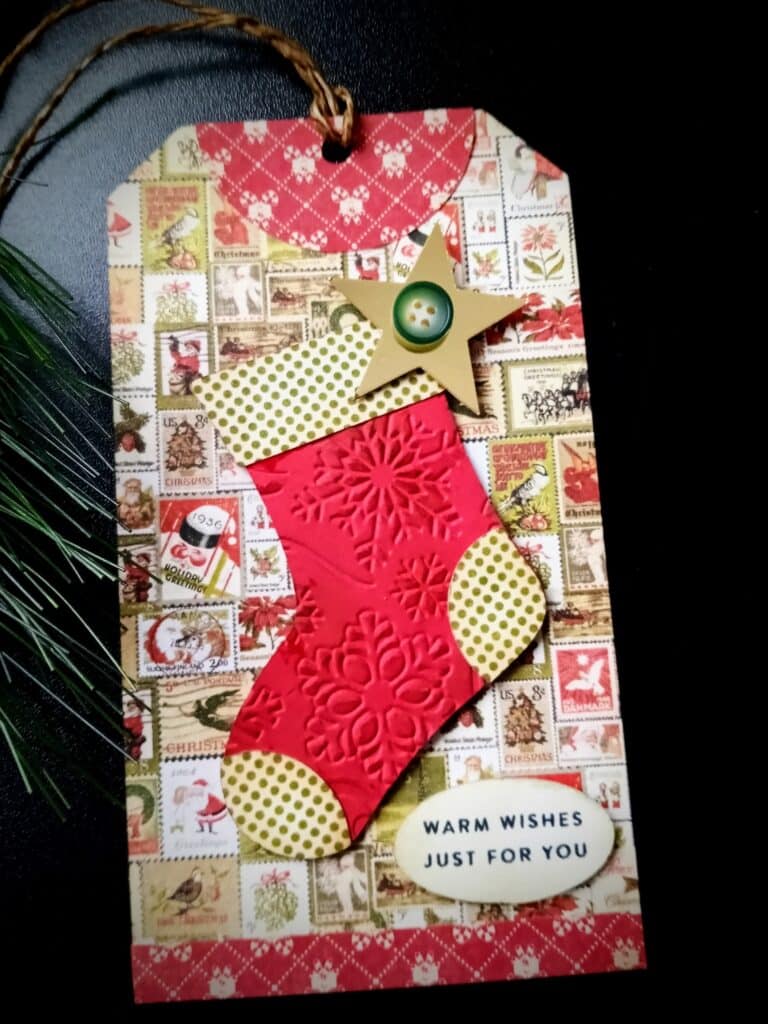
Christmas Stockings: DIY Cut File in Silhouette Studio
Hello! Hello! Today I want to share with you a Christmas Stocking tag that I created using a cut file I made myself in Silhouette Studio.
I love the power of the Silhouette Studio software for creating my own cut files. If you can imagine it, you can bring your creations to life in Silhouette Studio. I use the Business Edition, but it isn’t necessary for making this project.
The skills used in creating this cut file are mainly point editing, and cropping. Once you learn how to use the various tools in Silhouette Studio, you’ll be on your way to saving money when crafting as you create your own SVG files to use with your Cameo. With the Business Edition, you can even create files to save and use with your Cricut and other cutting machines.
This post contains affiliate links. I may earn a commission if a purchase is made when following these links. It never costs you more. Thanks for your support of Say It With Simplicity!
I shared a tutorial for making this cut file on my YouTube channel, so be sure to check it out. I’ve shared a link to it below this post.
I decided to use a few things up in my stash and make a tag with the cut file I made.
Supplies Used for My Tag
Size of tag -3.125″x 6″
- The paper by Authentique is no long available but it is from the Vintage Christmas Collection. I’ve always enjoyed the vintage look of the Authentique paper collections. I had just a few pieces from a 6×6 pack left, so I thought I’d put them to work.
- The background of the tag is from this paper pack as are the details on the stocking. This was also a cut file I created.
- I debossed the red stocking with a Darice embossing folder and my Cuttlebug. Embossing folders add so much dimension to projects. As I was unable to find a link to the folder online, I’m assuming it was discontinued. This really became a stash busting journey!!
- The details for the stocking were adhered with a Zig Glue Pen and foam tape used to pop up the Christmas stocking on the tag.
- The sentiment came from Simon Says Stamp-Tiny Words Christmas.
- I used a button on my gold foil cardstock star for some extra embellishment.
- Distress Inks by Tim Holtz in Vintage Photo and Old Paper from Scrapbook.com were used to bring about the vintage look to coordinate with the papers by Authentique.
- All other cardstock used was from my stash.
I’m sharing my finished tag with Crafty Hazelnut’s Christmas Challenge. This is an “Anything Goes” challenge as long as it’s Christmas, with the option of using buttons. I enjoy finding challenges from the many bloggers who post on the Paper Playful blog. While I don’t always post, it helps inspire me to see everyone’s creations.
I hope that you’ll go ahead and create your own stocking cut file. Below is a link to the video.
Thanks for stopping by today and have a wonderful day!!