Easter Bunny Treat or Gift Bag
I’ve been seeing many Easter Bunny treat or gift bags and I’ve been wanting to make some. Today I FINALLY got out my sewing machine and did it! Today I’m sharing how you can make your own treat bags.
To keep these super easy and inexpensive I used craft felt. Wool felt or even other fabrics would certainly work for these adorable Easter Bunny Treat bags.
Supplies Needed
- Sharp scissors.
- Sewing machine and thread
- Adhesive like felt glue or hot glue gun for the eyes (you could also use wiggly eyes)
- Ribbon
- Pom Poms if you want a cute fluffy bunny tail
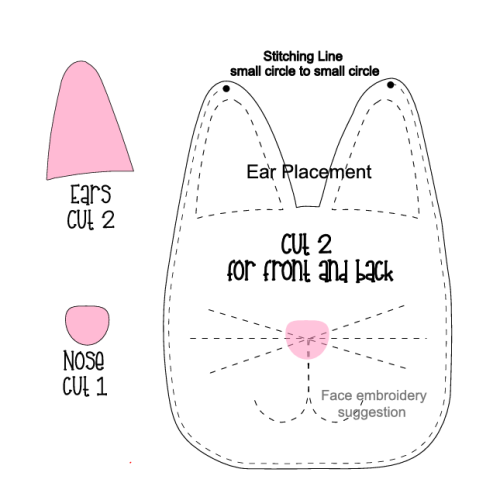
- Template or pattern (I’ve made one of my own that I’ll share at the end of the post)
- Pencil or heat erase friction pen to draw the face guide lines
- Optional embroidery needle and floss if you would rather embroider the face
- PDF Pattern
Heat Erase Pens
I love my heat erase pens. I didn’t have my dark one for the face on the white bunny, and I decided to wing it. Not such a good idea.
The neat thing about the heat erase pens is that you can just touch up the marks with an iron, and the marks you made disappear completely. It’s one of my favorite tools.
Cut your Pieces
First you’ll want to cut your pieces from your felt. Cut two each of the face, ears and eyes. Also be sure to cut a nose.
Next, you’ll want to sew the face features. I used a neutral thread and it worked for both the white and brown bunny.
Sew on the pink ear pieces. Then sew the whiskers and the other face features.
You might be thinking that there is lots of start-stop sewing, but for the whiskers you can sew from one side of the face to the next at an angle. Now you can simply position the nose over the intersection. Much faster and so much easier!!
As I said, we’re on the nose. See how fast this is going! Now you could totally hot glue the nose, but I like the sewn look. It’s kind of tight little area to sew, but go slow and pivot and you’ll be done in no time!
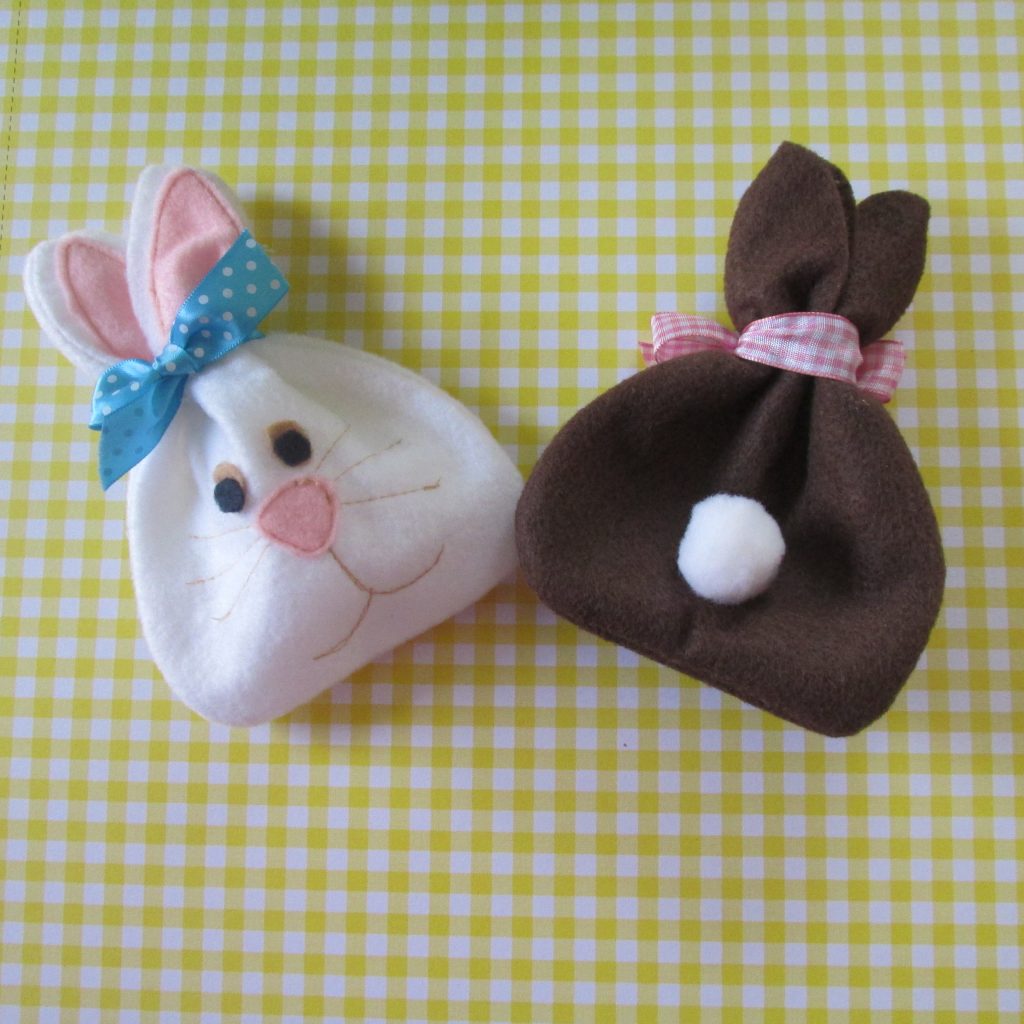
Adding the Tail
I added the tail after I sewed my halves together. I’m going to suggest that you do it before and here’s why. Alternatively, you could put a piece of paper or cardboard inside before you glue on the tail.
But here’s the warning: If you’re using hot glue, there is a slight chance that the glue could seep through, and you would end up gluing your front and back together by accident. After you’ve gone to all that work, you don’t want to mess up now.
Sew Front to Back
Now put your right (good) sides to the inside and sew around the outside edge. You’ll want to leave the top open so that you have a treat pouch. Sew from approximately the tip of the ear, down the side, around the base of the bunny. Continue up the other side to the tip of the other ear.
You’ll want to be sure to back stitch so that your bunny bag stays together. Now turn your bunny bag right-side-out and press the edges with your fingers to shape it.
Finish with a Cute Ribbon
Do you have some odds and ends of ribbon?
Yep! This is a great project for those small left over pieces.
Add the Easter treats and tie it all up with a piece of ribbon or twine.
These are so adorable! I decided to make a white bunny and a “chocolate” one. I know a few grand kiddos who will be excited about these little bunnies in a few weeks.
That’s it for today. I’ve created a link for you to download the PDF pattern. Hope you make some of these. Feel free to join the Facebook group and share your bunny treat bags there. I’d love to see your creations.
See you next time and have fun crafting!