Birthday Wishes Card With Hand Drawn Digital Stamp
A Wacom tablet was used to create the dog Digi stamp that I used for this card. I love crafting and experimenting with the Wacom was a fun challenge, so I wanted to share my results and create a card using my own image.

My oldest son surprised me with a very unique birthday gift earlier this year. It was a Wacom tablet. I mean I was TOTALLY surprised!
He knew that I had been experimenting with making some of my own SVG files, so it was a very thoughtful gift.
There is a bit of a learning curve to using a drawing tablet. I’m not going to lie. But as one who loves to experiment, I dove into trying to use it.
The Challenge
One of the things about the particular Wacom that I have is that you draw, on the tablet, but your drawing shows up on your computer screen. In place of the mouse, the drawing pen is used. Getting used to the differences takes some time.
My First Digi
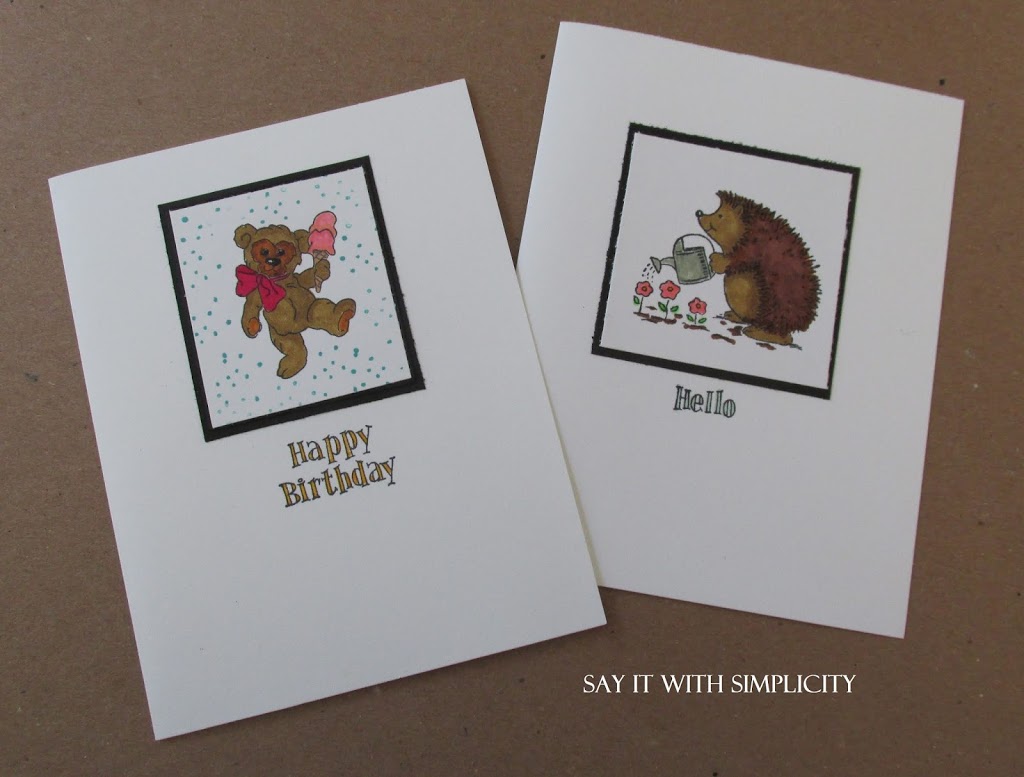
Originally my little dog friend was drawn on paper. I wanted to make him into something that I could save on my computer and use over and over again.
The beginning of the project was to scan my drawn image into Silhouette Studio. Then I used my Wacom tablet and the freehand drawing tool in Silhouette Studio to trace the image and transform it into a Digi.
Once finished, I saved it as an SVG file.
You can grab the PNG image and the SVG image for Print-and-Cut with the button below the post.
Making the Card
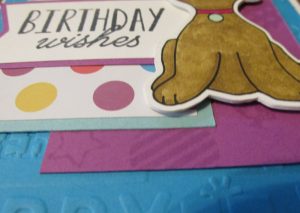
Using the offset tool, I gave the image a little bit of a border and did a print and cut. Together with multiple cuts of my outline were stacked to create a little dimension as shown above.
I used Spectrum Noir markers to color the image and set it aside to finish the rest of the card.
The stamps used, came from a set of Happy Birthday stamps that I bought at Joann Fabric and Craft Stores. I used some little balloons and a star from that set to create the purple on purple background.
“Birthday wishes” was stamped for the layered banner. Scraps from my stash were used to create the polka dot layer.
Together the elements were layered up over a blue panel that was embossed with the Cuttlebug and a Happy Birthday embossing folder.
All in all, I enjoyed experimenting with the Wacom and making my own Digi.
This card will be shared on the following challenge blogs:
Sunny Day Crafting
Thanks so much for joining me today.

Cute card and drawing! I happened upon your site by googling “Wacom and Silhouette Studio”. I was wondering if you can use a tablet with that program. Looks like, according to you, you can! I’m going to set out to try to figure out just how that’s done. If you have any pointers (since this post appears to be old), I’d love to hear them!
Hey Paula!
It’s certainly not the same experience as using it in a program like Illustrator or Affinity Designer where you have brushes and things to work with. Since this post, I have started using both of those programs with my Wacom.
If you go to the line style panel, you can change the line color and increase the line width and that’s helpful if you want that solid line look with the FreeHand drawing tools. Use detach lines if you want to make your lines into dimensional SVG lines. Keep line width at zero for your mono line designs. You might be able to come up with some neat sketches and could use the sketch panel to give them depth and dimension.
I think the other programs are more suited to using Wacom, but I love to experiment with new techniques and programs. Best wishes and thanks for commenting!