Vibrant Handcrafted Card With Tim Holtz Distress Inks
Every week I look forward to experimenting with card making techniques. Sometimes I’m inspired by a video that I watch. Often times I simply enjoy playing with a new supply.
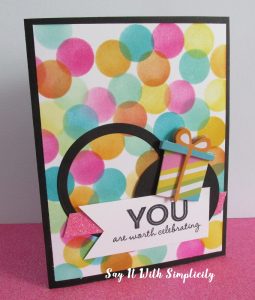
Today I wanted to share with you a card that was created using a new Tim Holtz Distress Mini Ink kit that I recently purchased.
The colors that come in the pack are so vibrant! Picked Raspberry, Mustard Seed, Peacock Feathers, and Spiced Marmalade. Even the names are vibrant!
I had an unopened Distress Oxide Ink in Cracked Pistachio in my stash. Yes! Never opened and I don’t know why. It’s an amazing color, so I added it to the mix when making this card.
The process for this card was pretty simple. I just started playing with the distress inks, so it was a little short on technique, but more in the way of fun.
I punched several circles in a piece of card stock with my one inch punch and created my own stencil. I then stenciled each dot for the background using a few small pieces of craft sponge, one for each color of ink.
When I finished, I thought that maybe I got a little carried away with making dots.
All of the dots were done on a white card base. As I sat there looking at it, more or less without a plan, I wasn’t sure I really liked it as it stood.
I thought to myself, “What it really needs is some black.” Scrapping my original card base idea, I cut it down to a 4.00 x 5.25 layer and instead made a black card base for it.
Remember I said that I enjoy playing with new supplies. I had this colorful card base done and wasn’t really sure where to go next. It seemed a little too busy for simply slapping a sentiment on and calling it done.
Dollar Tree Stickers and Sizzix Circle Dies
As I rummaged through my stash I saw some Dollar Tree Chipboard stickers, and decided to use one of them on the card. It doesn’t match perfectly, but I thought it coordinated pretty well.
Feeling like it needed a little more embellishment and not really finding any patterned or solid paper to match things up, I decided to go for the black once again. Yep, I like black. Can you tell?
The black seems to break up some of the busyness of all those colored dots. I used Sizzix circle dies and my Cuttlebug to make a solid circle that is 2 inches, and a little frame at 2 1/2 inches.
A little scrap of pink glitter paper gave it all a little more dimension and I stamped the “YOU are worth celebrating” on a little banner that I cut out.
This is an older stamp from the Blossom Card Making Workshop from Close To My Heart.
In the end, what started out as an experiment, turned out cute! I love playing along with card making challenges, so today I’m sharing this card with Send a Smile 4 Kids Anything Goes Challenge and Pause Dream Enjoy Challenges #24.
That’s it for today. I’d love to hear your comments on this colorful card.
As always, thanks for stopping by and have a wonderful day!
text 2018, photos and information by Say It With Simplicity

