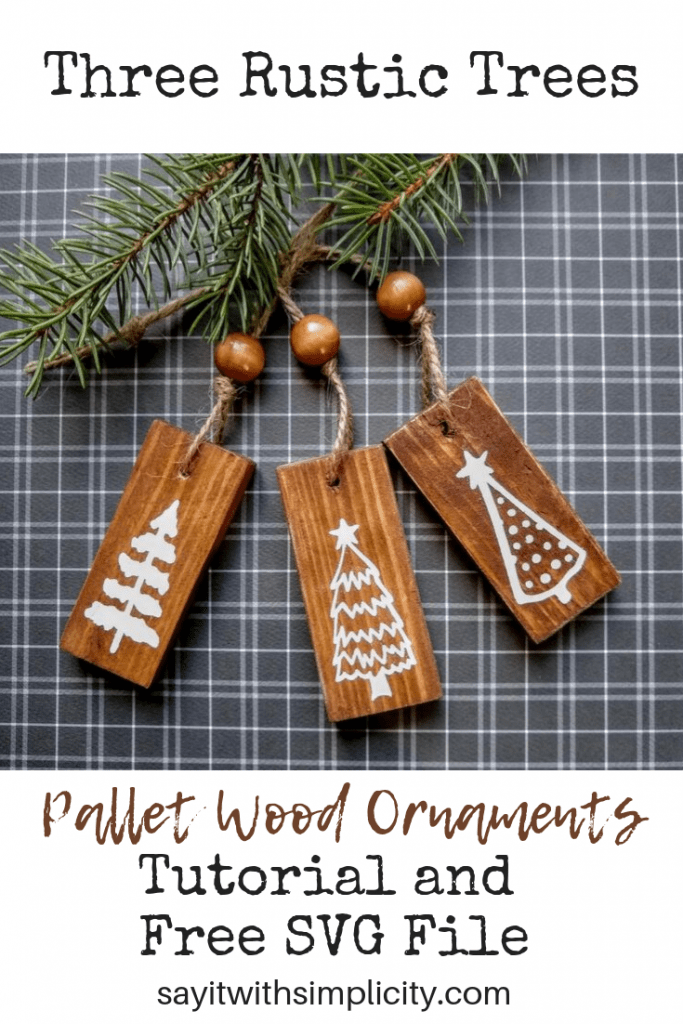
Three Rustic Trees Ornaments and Free SVG
Today we’ll be making Three Rustic Trees Ornaments from reclaimed wood.
This post may contain affiliate links. As an Amazon Associate, I earn from qualifying purchases.
These rustic tree ornaments are made from pallet scraps from one of my latest pallet sign projects. They are super simple to make and can be made from any small pieces of wood.
These make great craft fair items as well as gifts for Christmas.
The pallet that I took apart for a recent project had boards that were only 3/8″ thick and so it was perfect for these ornaments. The overall dimensions of the face are 1 3/8″ x 3″.
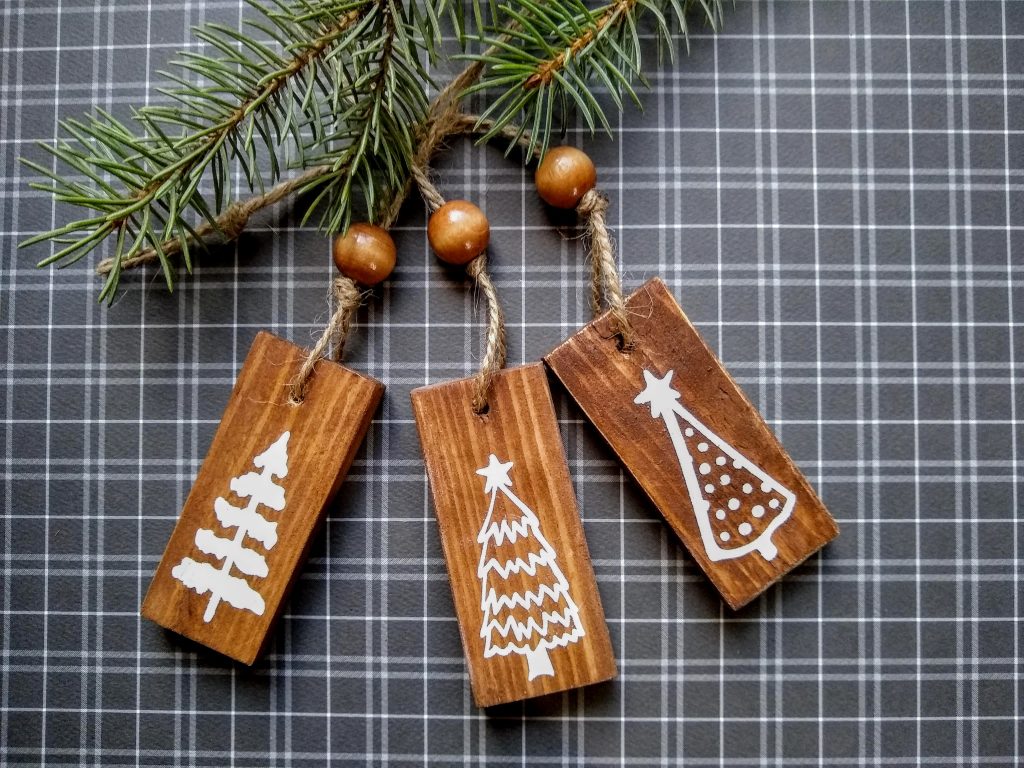
After my pieces were cut, I drilled holes about 3/8″ from the top of the ornament so that I could string some jute twine through.
Each ornament was then stained using Deco Art Vintage Effect Wash in Brown. Sometimes I add a little black to darken it up a bit.
One of the things I like about this product is that it stains the wood, and dries quickly. No long wait for the stain to dry.
Once your wash base coat is dry, you are ready to start painting the trees on your three rustic trees ornaments.
Creating the Three Rustic Trees Stencil
I used my Silhouette Cameo 3 to cut the stencil for my ornaments. I’ve been using the Auto Blade with the Matte Vinyl setting. It works perfectly with my machine, even on these tiny stencils.
One of the best ways for sizing your trees on your stencil is to make a rectangle in Silhouette Studio that is the same size as your ornament.
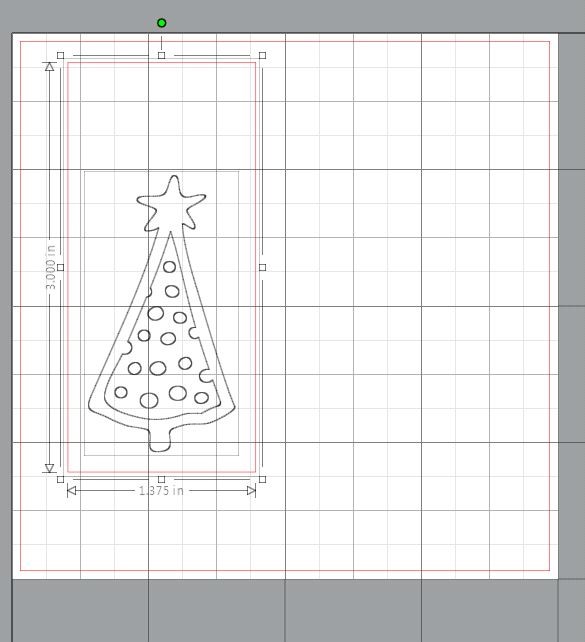
Then you can place your SVG inside the rectangle. This also helps with weeding your design and getting accurate placement on your project.
I used Oracal 631 for my stencil. This is a great way to use up some scraps of vinyl if you have any.
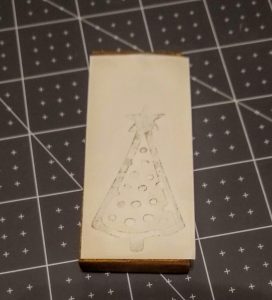
In the photo below, my stencil is all weeded and ready to go.

For many of my transfer tape applications, I use TransferRite clear transfer material. This is sticky, but not too sticky.
Once your stencil is down, you can remove your transfer tape and start painting. Be sure your stencil is firmly pressed to the wood to prevent bleeds.
I used a makeup sponge to apply light coats of Waverly Chalk Paint to my stencil.
Finishing Your Ornament
Once your paint is dry, you may remove your stencil vinyl.
Stringing your twine is really a personal preference. I used jute twine, and then tied a knot above the ornament.
Next, I pulled my ends through a wooden bead. You can find these at most craft stores.
I had some assorted beads in earth tone colors from another craft project, but you could leave them off the bead if you prefer.
The bead rests on top of the knot.
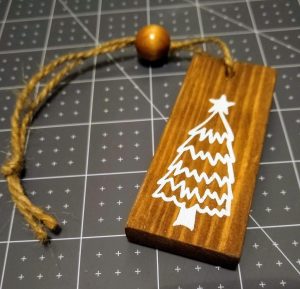
Now you just tie the ends of your twine at the top, and your ornament is ready to hang on the tree.
I like to keep my wood projects protected with a clear matte sealer. My favorite as of late is Rust-Oleum Chalked Matte Clear protective topcoat. I can usually find this at my local home improvement store.
I’ve been able to protect many signs and small projects out of one can of matte clear spray. I feel much more confident giving a gift that I know is going to stand the test of time.
These turned out so adorable and would also be a great wine bottle gift tag or package topper. So many possibilities, so much fun! They could be used for larger pallet sign projects as well.
For More Stencil Projects Check Out These Posts
Farm Fresh Pumpkins Stenciled Signs
DIY Quilt Square Block and Free SVG
Jesus Loves Me Reclaimed Pallet Wood Sign
Your Free SVG Files
I’m including the download button for these SVG files for these three rustic trees ornaments at the end of this post or right HERE. They will be in one zipped folder for easy download.
*Note: This file has been recently edited from it’s original to be more user friendly for Cricut Design Space. Thank you!
While you’re here, be sure to check out the Free SVG Library for more cutting machine files!
These are for personal use only. Please do not use these files for commercial use or as part of another file you create.
If you like this project, please be sure to share it on Pinterest.
Be sure to grab your SVG Freebie by hitting the button below. Thanks for stopping by today and have a great day!


Hi! Thank you for sharing this cute idea. I downloaded the images to my cricut design space but the image is very light and I can’t see it. I am wondering if I am doing something wrong or if the small thin lines of the design can’t be recognized.
Again thank you
Lori
Hi Lori,
Thanks for bringing it to my attention. I checked out the file, and it may be that I saved it without a fill color. It is there. If you add it to your canvas in Design Space it will appear on your screen in solid black and should be no problem cutting. But I will check that file and change it so that doesn’t happen to Design Space users in the future. Thanks!
Connie