Spring and Easter Card Making
*This post contains affiliate links. I may earn a commission when you click on these links and make a purchase. As an Amazon Associate, I earn from qualifying purchases.
On the blog today, I’m sharing a couple of spring and Easter cards that I made this week. I created the bunny for one of the cards. Join me as I share how I made these cards. Stay tuned because at the end of this post I will share a PDF template for the bunny and carrot so that you can make your own card.
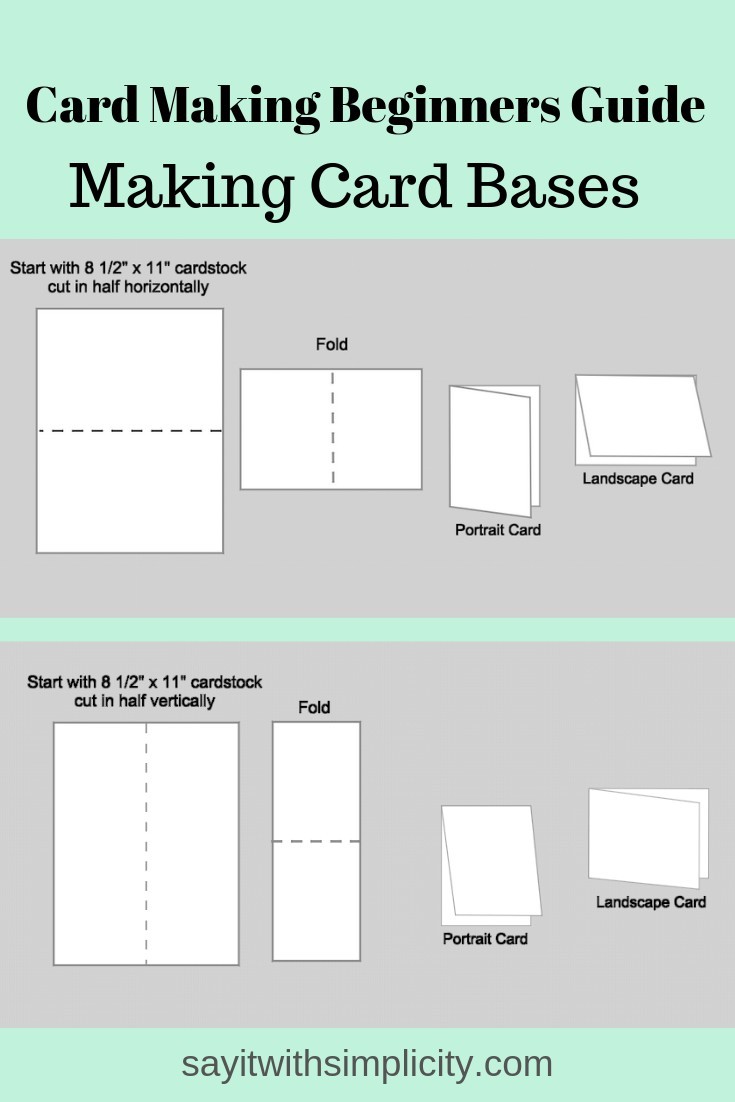
For my card base, I started out with a sheet of Georgia Pacific 110# white cardstock. One 8.5″x 11″ sheet cut in half will yield two card bases. This is a great cardstock for the beginning card maker and I’ve been using it for a while for most of my handmade cards.
For more tips on creating your own card bases, check out THIS POST.
I used the Spring Fling paper pack by Lori Whitlock for both of these cards. It’s so bright and fun and I have more cards planned for it.
Hello Spring Card
This was a super simple card to make. I added a pink cardstock mat to the top of my card base, cut at 4″ x 5 1/4 inches, then layered the cute blue paper over the top. Which was cut at 3.75″ x 5″. Then I cut a piece of the floral paper at 2″ x 4 1/2 inches and matted it with the same pink from the card base.
The plaid piece of patterned paper was cut at about 3″ x 1 7/8 and also matted in pink.
The HELLO SPRING sentiment was an element from the paper pack and I used a corner rounder on it. I also used the corner rounder on the blue mat under it. The blue was from the paper pack and so it coordinates well with the card.
I used a few dots of pink Bubblegum Blush Nuvo drops to add just a little more to the upper right-hand corner. That was it for this card. It turned out so…..cute and didn’t take very long at all.
Easter Blessings Card
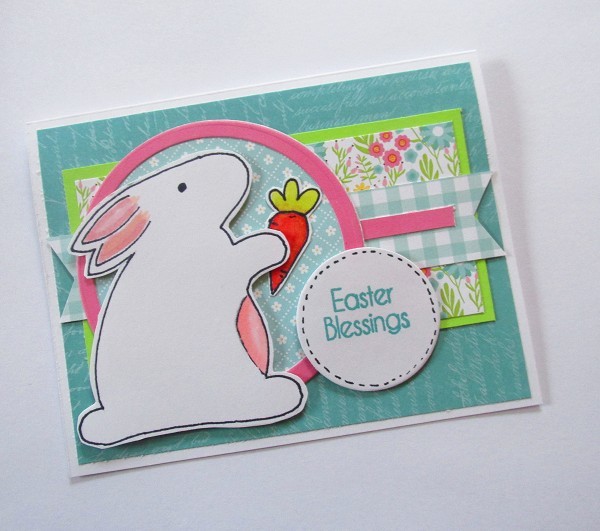
Now I turned my attention to the Easter Blessings card. The stamped sentiment for this card came from The Stamps of Life Easter Bunny stamp set. I’ll include a link to this stamp set. While I’m not affiliated in any way with Stamps of Life, I love the products and have many of Stephanie’s stamps that I use often. You can find this stamp set HERE.
You could certainly use any sentiments stamps, papers, and other elements that you have. Lots of options!
This was stamped on a circle that was cut using these circle dies and my Cuttlebug. This is one of the few die sets that I have. I usually use my cutting machines for basic shapes. This was quick and easy. Die cuts add so much to handcrafted cards. I used a BIC Mark-It to add a little faux stitching around the edge. I’ve included the links for these products below, for your convenience.
The BIC Mark-IT pen is a great beginner option for bringing some of your doodles to life.
I’m going to be teaching a doodling class at our next 4-H Family Learning Day and plan to use the BIC Mark-It pens for my workshop.
Drawing the Bunny and Carrot
The bunny and carrot were drawn lightly with a pencil on cardstock. Then I used the BIC Mark-It to go over the lines. The coloring was done with Spectrum Noir Markers. These are my favorites for coloring in images.
Now you can cut around the outline of your doodle and you have a super simple element to add to your card. This is a great option if you don’t have lots and lots of stamps. I know that some of you may shy away from drawing altogether. I take out a piece of paper and do a little drawing every day and it’s really a great habit to get into. If you only spent 5 minutes, it’s a great way to add to your crafting skills. It’s also an amazing stress reducer.
The layered elements along with the bright colors, just really speak spring to me. I had lots of fun making these cards.
The layers for the bunny are as follows:
- Bottom rectangular mat- 5 1/4″ x 4″. If using directional paper, cut accordingly.
- Floral rectangle – 4 1/2″ x 2 2/4″
- Green rectangular mat for the floral- 4 3/4″ x 2 1/2″
- Gingham banner – 5 1/4″ x 1″ I put a small scrap pink strip for a little more dimension.
- Pink circle- 3 1/4″ (this is actually an outline cut with the dies, but it can be done in layers.
- Use either your next smaller circle die or cut the patterned paper circle at 3″.
Now, if I haven’t convinced you to draw your own bunny, I have created a special “Bunny Card Builder” PDF file containing the bunny and a few other elements. You can print this file to trace the elements for making your own card. This would work especially well if you want to create this card along with your kids.
Just click on the button below to go to the PDF file. Download it to your computer, print it out and you’ll be on your way to making your own card.