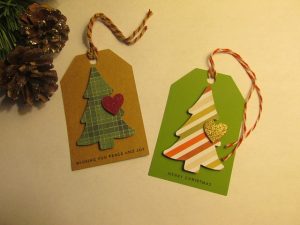
Christmas Gift Tags Cricut Explore
Creating for your home and family during this gift-giving season is quick and easy with your Cricut. Today I wanted to share with you how I made these Christmas Gift Tags in Cricut Design Space. I hope you’ll be inspired to get out your Cricut and make some for yourself.
Creating Christmas Gift Tags in Cricut Design Space
The tag and Christmas tree images that I used to make my tags were from the Tags, Bags, Boxes and More 2 collection.
Several years ago when I was a Cricut newbie, one of the things I didn’t know, was how to hide contours. Therefore, I totally overlooked some of the images that I could have been using.
Using the Contours Button in Cricut Design Space
Knowing how to hide contours opens up a whole new world of possibilities for using images in Design Space.
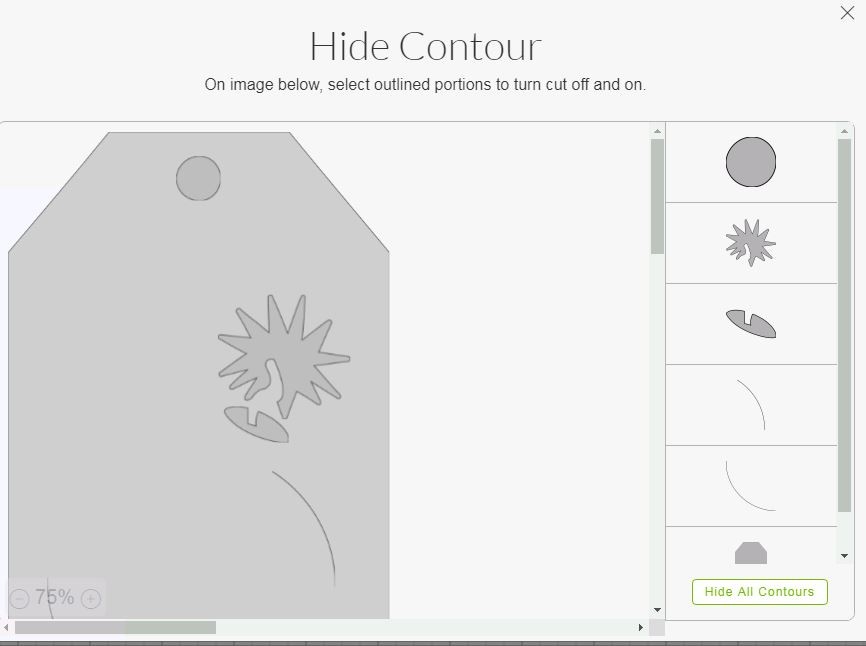
You’ll find the Contours button on the way lower right side of your canvas in Cricut Design Space. I liked this tag image, but it still had some cut lines that I didn’t want in my project.
So in the photo above, I’ve opened up my image in Design Space, and I already UnGrouped and deleted the layers that I didn’t want to use.
Then I went to that contours button, lower right, and clicked on it.
This brings up your image and shows all the remaining cut lines.
All I wanted to use from this image was the tag and the hole at the top of the tag.
Now I clicked on all the parts of the image that I didn’t want. When I returned to my canvas, all I had was my tag image.
SO EASY!
Next, I found a tree image that was also in Tags, Bags, Boxes and More 2. I also UnGrouped this image and hid the contours on the hole in the tag. In this way, I could just use the tree image that I wanted.

Assemble Your Tags
I selected kraft and textured card stocks for cutting out my tag bases. I used Tiny Words Christmas from Simon Says Stamp to stamp the bottom of my tags, but you can certainly use whatever stamps you have in your stash.
The tree images were cut from patterned paper, and also from kraft card stock. I layered these using Art Glitter Glue as my adhesive. This gave the trees and almost “chipboard” impact that I really liked.
I layered the trees on with foam tape and mounted them to my tag bases.

The little hearts were made using the basic shapes from Cricut Design Space. I cut these with glitter card stock and mounted them to the trees. You could use glue dots, glue or another little piece of foam tape. I just love the dimension these have.
Adding some cute twine adds another texture and gives these a homespun, yet elegant, look. So simple!
Thanks for joining me today on Say it With Simplicity. I hope this tutorial inspired you to get out your Cricut and create something for your family and friends today!
Connie